Automated measurements (time-resolved)

Background:

Time-resolved Brillouin light scattering measurements always include two separate deviced, i.e., the Tandem Fabry-Pérot interferometer and the Time Tagger and their according software modules which have to be synchronized.

This synchronization is achieved by a hardware- and software synchronization and the latter must be taken into account when setting up an automated time-resolved measurement.

The reasons/background are:

  • The Time Tagger software can, in principle, start the TFPDAS software
  • But, the Time Tagger software is NOT notified if an error occurs in the TFPDAS software
  • The Time Tagger software is not notified when a spectrum is acquired
  • The Time Tagger software cannot read out the TFPDAS spectrum

Thus, a certain measurement procedure is required as described below.

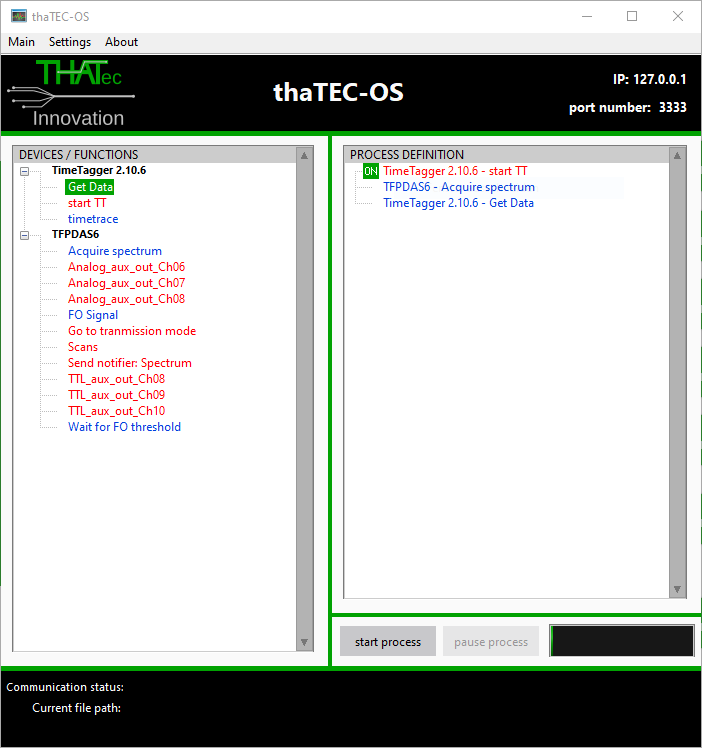
Measurement procedure (see also image below):

  1. Arm the Time Tagger via the “start TT” command: This activates the Time Tagger software. However, due to the hardware synchronization, signal will only be acquired when the TFPI is actually scanning. Thus, there can be an arbitrary delay between the arming of the Time Tagger and the acquisition of the spectrum.
  2. “Acquire spectrum” command to the TFPDAS software: This will start the acquisition (and, hence, the acquisition of the time-resolved signal since the Time Tagger has been armed before). Furthermore, this command will wait for the acquisition to finish!
  3. “Get data” command to the Time Tagger software: This will return the 2D time- and frequency-resolved measurement data.

Adjusting the Time Tagger trigger levels

Correct trigger levels are crucial for a correct operation of the Time Tagger software module.

To adjust the trigger levels, open the device settings window via the menu bar => Device => Hardware settings

Make sure that the channel number settings matches the input connections at the hardware. Subsequently, adjust the trigger levels of each channel. To check the settings, activate the Check trigger levels button at the bottom of the window. Not in the counts/s row, the current countrates of each channel are displayed. Check if the countrates match the input signals:

  • Start signal: Repetition of the pulse generator
  • Stop signal: Bring the TFPI into reflection/alignment mode and check the signal intensity. Note: the expected countrate depends on the scanning speed (ms/channel) of thaTEC:TFPDAS! Example: overall intensity: 400 counts/channel and scan speed 1 ms/channel => expected average countrate: 400.000 counts/s
  •  Counter: With thaTEC:TFPDAS in measurement mode (spectrum is being acquired), the countrate of this channel should match half the scanning speed (ms/channel). Please note that during the retract of the interferometer mirrors, no signal is applied to this channel reducing the expected average countrate. Example: scan speed 1 ms/channel => expected average countrate: 500 counts/s.
  • Reset: The trigger level should be the same as for the counter channel. The expected countrate should match the rate of acquired scans of thaTEC:TFPDAS during a measurement.
  • Gate: The trigger level should be the same as for the counter and the reset channel and also match the rate of acquired scans of thaTEC:TFPDAS during a measurement times the number of (non overlapping) ROIs. Example: thaTEC:TFPDAS is scanning with a speed of 1 scan per second and there are 2 ROIs => Expected countrate: 2 counts/s.

Important Note:

Even if the count rates (in particular for the stop channel/detector) match the expectations, a too low value might result in a wrong timing since some pulses might be detected earlier than others due to variations of the pulse shape. Thus, always check if the acquired signal matches the expectations. Below, the result for a 50 ns long pulsed excitation is shown with incorrect (left) and correct (right) trigger level settings displaying the effect on the acquired data.

License error for feature 19/feature 21

Depending on the date of purchase of your license, your dongle has feature 19 or feature 21 activated for time-resolved Brillouin light scattering measurements using a Time Tagger from Swabian Instruments.

Thus, after downloading the software if a license error occurs on the first startup even though the USB donlge is present, you need to manually select the feature. To do so, select File => License setting from the menu bar and select Feature 19 or Feature 21 according to your license and restart the application.